Windows XP Picture and Fax Viewer is on Windows XP but was discontinued in Windows Vista and replaced in Windows 7 and 8 with Windows Photo Viewer.
Although I like the Windows 7 Photo Viewer I also like the Windows XP one.
I came saw this post on Techguy Forums that explains how to get it working on Windows 7 and Windows 8.
So here is how to install it on Windows 8 and Windows 7.
First you need to go to Windows XP or a computer that has XP on it.
On Windows XP.
Go to C/Windows/System32 folder.
Copy Shimvw.dll file from XP.
Then copy or transfer the file onto Windows 7 or 8.
On Windows 7 or 8.
Then place it in the Windows Folder on Windows 8 or Windows 7.
As shown in image:
 |
| Place the dill file in the Windows folder on Windows 8. |
The Shimvw.dll file from XP must be placed in the Windows Folder not in System 32 for it to work.
This is because the System32 folder on Windows 7 and 8 already has the Windows 7 version of Shimvw.dll. So if you put the XP one in there it will over right it. So the XP file must be in the Windows folder for it to work.
Then copy the following code:
Windows Registry Editor Version 5.00
[HKEY_CURRENT_USER\Software\Microsoft\Windows NT\CurrentVersion\AppCompatFlags\Layers]
"C:\\Windows\\System32\\rundll32.exe"="VISTARTM"
[HKEY_LOCAL_MACHINE\SOFTWARE\Microsoft\Windows NT\CurrentVersion\AppCompatFlags\Layers]
"C:\\Windows\\System32\\rundll32.exe"="VISTARTM"
[HKEY_CLASSES_ROOT\.BMP]
@="BMPImage.Document"
[HKEY_CLASSES_ROOT\BMPImage.Document\DefaultIcon]
@="%SystemRoot%\\System32\\imageres.dll,-70"
[HKEY_CLASSES_ROOT\BMPImage.Document\shell\open\command]
@="C:\\Windows\\System32\\rundll32.exe C:\\Windows\\shimgvw.dll,ImageView_Fullscreen %1"
[HKEY_CLASSES_ROOT\.GIF]
@="GIFImage.Document"
[HKEY_CLASSES_ROOT\GIFImage.Document\DefaultIcon]
@="%SystemRoot%\\System32\\imageres.dll,-71"
[HKEY_CLASSES_ROOT\GIFImage.Document\shell\open\command]
@="C:\\Windows\\System32\\rundll32.exe C:\\Windows\\shimgvw.dll,ImageView_Fullscreen %1"
[HKEY_CLASSES_ROOT\.JPG]
@="JPGImage.Document"
[HKEY_CLASSES_ROOT\JPGImage.Document\DefaultIcon]
@="%SystemRoot%\\System32\\imageres.dll,-72"
[HKEY_CLASSES_ROOT\JPGImage.Document\shell\open\command]
@="C:\\Windows\\System32\\rundll32.exe C:\\Windows\\shimgvw.dll,ImageView_Fullscreen %1"
[HKEY_CLASSES_ROOT\.PNG]
@="PNGImage.Document"
[HKEY_CLASSES_ROOT\PNGImage.Document\DefaultIcon]
@="%SystemRoot%\\System32\\imageres.dll,-83"
[HKEY_CLASSES_ROOT\PNGImage.Document\shell\open\command]
@="C:\\Windows\\System32\\rundll32.exe C:\\Windows\\shimgvw.dll,ImageView_Fullscreen %1"
[HKEY_CLASSES_ROOT\.TIF]
@="TIFImage.Document"
[HKEY_CLASSES_ROOT\TIFImage.Document\DefaultIcon]
@="%SystemRoot%\\System32\\imageres.dll,-70"
[HKEY_CLASSES_ROOT\TIFImage.Document\shell\open\command]
@="C:\\Windows\\System32\\rundll32.exe C:\\Windows\\shimgvw.dll,ImageView_Fullscreen %1"
Paste the above code in Notepad and save it as a registry file.
By typing XP7.reg when it prompts you to save the file.
Restart your computer and XP Photo Viewer will now work.
Here is the forum link where I found out how to do this here:
Techguylabs Forums.
Windows Picture Viewer now appears in list of programs .

Windows XP Picture Viewer works on both Windows 7 and 8 and also Windows 8.1. But does not work on Windows Vista, despite my best efforts to try to get it working.
Probably because the system on Vista is slightly different to Windows 7 in that it already has Windows Photo Gallery, which replaced the Photo Viewer. So that could be why the XP Photo Viewer cannot does not work on there.
But it certainly does work on Windows 7 and 8 and will run alongside the Windows 7 Photo Viewer.
The Windows XP Photo Viewer is an earlier version of W7 Photo Viewer.
Well I think so anyway.
Windows XP Picture Viewer on Windows 8.
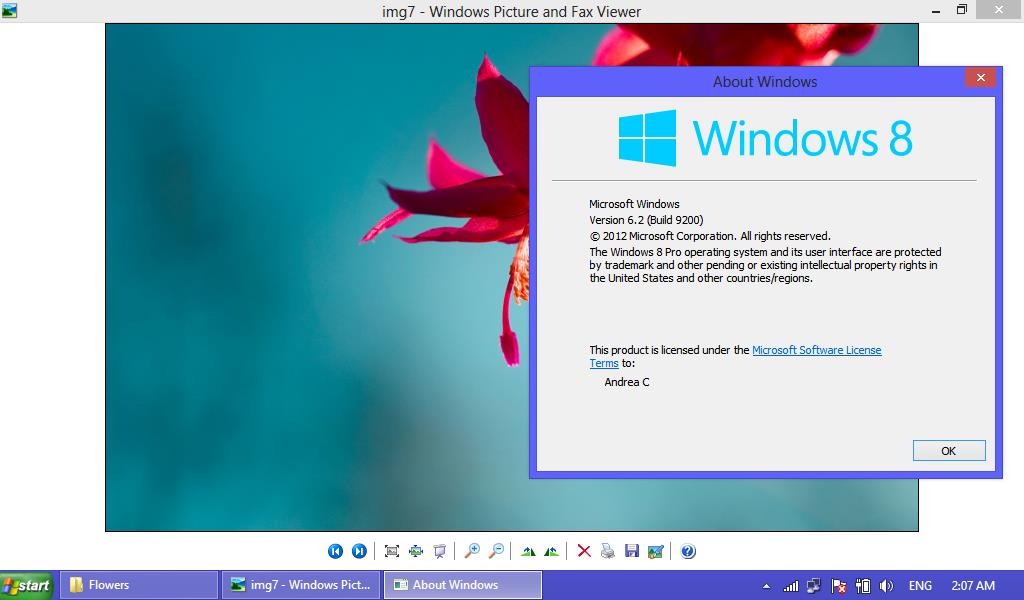 |
| Windows XP Picture And Fax Viewer on Windows 8. |
See also my video on how to do this.


No comments:
Post a Comment
Note: only a member of this blog may post a comment.